Sunday, December 7, 2014

On the Trail of the Fisher

Two of my fall traditions came together this year in the form of fisher tracks and photos. My father
Fisher crosses a log
11/12, Fremont, NY
owns about 80 acres of forest and field in the town of Fremont, NY and each fall semester I put out ten camera traps in hopes of capturing images of black bears. Two weeks later, I bring my Black Bear Management class to the property and we retrieve the cameras and look for signs of bear. We did succeed in capturing a (single) image of a black bear but the real star of the show this year was fisher.
Fisher are recent additions to the fauna of that area. In 2012, I saw a fisher from my tree stand and decided that day I would try a camera trap set to capture an image. There is a small gully on the property with a fallen tree acting as a natural bridge. I reasoned that this was a perfect location for a fisher to travel. I was right, It only took 36 hours to capture a fisher with my Cuddeback camera. And it didn't take long to get a second photo:
Fisher crossing log
11/12, Fremont, NY
Since then, fisher have shown up regularly on my cameras. They really are rapidly expanding their range in our part of New York State. Most of my students have never seen one and many do not live in areas where fisher are common yet. So although we are targeting black bears in this particular project, the fisher photos are welcomed by all.
To increase our chances of bear captures, we set out ten (or so) cameras for two weeks in a variety of situations including game trails, mowed paths and likely looking locations on the landscape. But the
Adding lure to a rotting log
secret weapon has been the use of a commercially available lure called Ultimate Bear Lure by a company called Wildlife Research Center. This sweet-smelling lure has brought bears to the cameras in the past but we also get other animals like red fox, raccoon and even deer sniffing at the lure. And of course, fisher. At left is a photo of me taking a minute out of my turkey hunting to freshen up the scent at this set. I chose this location because I believe the rotting log holds the scent better than just pouring it into the ground. Besides, that's my Dad's hunting blind in the background and this set can serve double duty by scouting for deer.

Although no bears appeared at this set, we did capture a fisher marking over the scent. According to Elbroch and Rinehart (2011), fisher will rub their bellies to scent mark. The Reconyx camera at this set took several bursts of ten images that work almost as a video. Have a look:
This was an exciting capture for me. I love documenting a behavior or other aspect of an animal's natural history. This particular scent marking was new to me, and I was excited to read about it. It wasn't long before I was able to put this new knowledge into practice.

Fisher tracks in fresh snow
11/12, Fremont, NY
I started this blog entry by talking of two autumn traditions. The first was setting camera traps for my bear class and the other is hunting with my Father. This year's deer season didn't produce many deer but was productive in other ways. Last weekend, while heading to my hunting spot, I found fisher tracks. It has snowed overnight so these were very fresh tracks. I wondered if the fisher visited that tree to scent mark. I couldn't detect any odor though. I back tracked this fisher for a few hundred yards. A typical gait for fisher is a lope. Here, the fisher loped down the center of the trail and was straddled by Dad's ATV.

Fisher tracks
Fisher are members of the weasel family and have five toes on each foot. 

That night, it snowed again. Maybe an inch, maybe less. In the morning I returned to my deer stand only to find fresh fisher tracks on top of the fisher trail from yesterday. I had questions! Was this the same fisher or another? Why would it retrace its own steps from the night before? Or was he following MY footsteps? Was this another fisher discovering an intruder? All these questions remain
Fisher scent marking
11/14, Fremont, NY
unanswered. As I followed fresh fisher tracks for the second time in two days, I found myself crossing the ATV trail. But this time the fisher did not walk across the trail. It dragged its belly in a scent marking behavior. I have to admit that for a moment I wondered if I was looking at an otter slide. But it was fisher. A fisher doing the same thing in the snow as the one on camera did on the log. In fact, given the large home ranges of fisher, this is most probably the same fisher as the one photographed. I took several pictures of this marking from different angles:


Above, you can see the imprints that the rear legs left when it shuffled its belly along the ground.

Fisher tracks
11/14, Fremont, Wayland NY

Fisher scent marking
11/14, Fremont NY
This fisher was in the mood to scent mark. Whereas I followed the fisher the day before for over 300 yards and did not find a single scent marking behavior, the fisher trail on this day showed numerous scenting. I found four scent marks within 20 yards of the ATV trail. I could not detect an oder at any of them (although I was stuffed up from a cold). Why the difference? I am left to wonder if somehow I influenced the fisher's behavior. Was the marking due to my footprints (and scent) or was this truly a second fisher marking over an intruder? It is questions like these that make camera trapping and tracking so enjoyable.

Tuesday, November 11, 2014

Tracking in Rocky Mountain National Park

I had the opportunity to visit Rocky Mountain National Park (RMNP) around a business meeting I attended in Denver. When I arrived, the weather was sunny and 65F. On my final day, it was 5F and
Balmy November day at RMNP
Estes Park, CO (11/14)
had snowed during the night. My goal - dream really - was to get into the park early and drive the roads slowly to find a set of mountain lion tracks that cut the road. This is a common technique for finding tracks (and the cats themselves) but the fresh snow was a mixed blessing. On the one hand, anything I found would be absolutely recent (the nearest I could tell the snow had stopped around midnight), but on the other hand it meant that I would ONLY be finding tracks made in the last eight hours. That was going to make my task a long shot. Spoiler alert: I found no cat tracks. But I did have some interesting tracking experiences. Let me share two:

Rocky Mountain National Park
Estes Park, CO (11/14)
I wasn't the first to make it into the park today, I was the third. I followed two sets of tire tracks from the park entrance and slowly made my way through the snowy winterland. A pair of coyote trails followed the road for a while and I kept one eye on the distinctive side trot pattern and the other eye on the fresh snow looking for other tracks (that leaves no eyes for the road for those of you counting...). Despite my scrutiny of the road shoulders, it was a scene in a field that caught my eye. As you can see in the photo, everything was covered in a fine powder so when I saw something that WASN'T white, it stood out immediately.


These elk trails in the grass were so obvious to me but I wonder how many similar scenes I had missed over the years when I was less attuned to wildlife sign. I pulled the rental car over and snapped a few photos:

Elk trails in the snow
RMNP (11/14)

The tracks were easy to find as they crossed the road. I took a tracking class a few years ago and David Moskowitz was one of the instructors. He is the author of Wildlife of the Pacific Northwest and describes elk tracks as hamburger buns. As a long time burger-eater, I concur:
Fresh elk tracks
RMNP (11/14)
Here is a photo of the trail:

One even scatted for me:

So I had the trails coming towards me and I had the fresh tracks on the road in front of me. All that was left was for me to look at the direction the traveled. Sure enough, I only had to lift my head to see elk.
Elk
RMNP 11/14)
Elk
RMNP, (11/14)
There were far more elk above me than the tracks indicated. I looked ahead on the road and found more tracks and more trails. The story was complete.
Elk trails in fresh snow
RMNP, (11/14)
There was something very satisfying about this whole encounter. Reading sign that in this case, was verified by the individuals themselves. It was a simple story of a common animal, but I relished it nonetheless.:)

My second tracking story is more of a mystery. After driving the roads I layered up against the cold and started on a hike up Deer Mountain. The summit was a mere 3.1 miles away with a vertical gain of 1,080 feet. I was the only car parked at the trailhead. I brought the small lens instead of the telephoto as I was going to primarily take photos of wildlife tracks and sign. I spotted a nice variety of tracks including long-tailed weasel, elk, mule deer, snowshoe hare, mountain cottontail, chipmunk sp, red squirrel and perhaps one or two others that I have forgotten.

Here is a nice mule deer track to compare to the elk tracks above Not only are they smaller in size, but they are a different shape. Gone is the hamburger bun, replaced by a heart.
Mule deer track
RMNP, (11/14)
I enjoyed the solitude and the view. The trail switchbacked up into a sparse pine forest.
Deer Mountain Trail
RMNP (11/14)
Selfie
RMNP, (11/14)
As I neared the summit, I saw a snow-covered shape in the trail. My first thought was "That rock looks just like a rabbit." My second thought: "That is a rabbit."
Dead mountain or Nuttall's cottontail
RMNP, (11/14)
I cautiously brushed off some snow and saw that it had been killed by a wound to the throat. Weasels are known for that type of kill. Some of the flesh was eaten, but i will save you from the gruesome photos.
RMNP, (11/14)
Cause of death was a bite to the throat
RMNP, (11/14)
One member of the weasel family that could be a suspect here is the marten (Martes americanus). Here is a video I found of a marten killing a rabbit. But I had not seen any marten tracks. I HAD found long-tailed weasel tracks. Twice along this trail. The lack of blood would also be indicative of this weasel as they are known to lick up the blood from a kill. I am not certain the l-t weasel was the culprit, but since the snow had covered up the evidence, I was free to speculate and move on. So I did. And I only took a few steps when I noticed that the snow had not erased ALL the evidence. Look here:

This is a terrible photo looking back towards the dead rabbit. I wasn't paying attention to proper exposure, tricky when taking photos of snow. But if you look down the center of the photo, you can see that there is a trough under the snow. A furrow that had been snowed over, as if the rabbit had been dragged to its present location. Still can't see it? It runs the length of the photo, pretty much in the center. Let me try to darken the photo and see if that helps...


Well, on my monitor I can see the drag mark now. Here is another that I had to darken as well:


Here you can see rabbit tracks emerging from the left side of the photo and the start of the drag on the right side leading to the bottom right corner. I believe this is where the rabbit was killed. Could a long-tailed weasel drag a mountain cottontail 20 yards? Maybe. It was dragged downhill and there was a coating of snow present to help reduce friction. The fresh snow made it impossible to tell the whole story. But I enjoyed trying to puzzle it out. I left the rabbit where I found it. I wonder what the next hiker will find.


Wednesday, July 30, 2014

Small Mammal Trapping: Techniques for safe capture

If I asked most people to quickly name three mammals, I believe most of them would name larger mammals. Pets like dogs or cats, farm animals like horses or cows and zoo animals like elephants and giraffes would probably be common. Yet this is such a skewed sample of the mammals that currently live on this planet. Although our minds go to the more charismatic examples of mammals, the truth is that over 90% of mammal species are small. Merritt (2010) defines a small mammal as one weighing five kilograms or less. For my students and I, that translates to about 11 pounds. Woodchucks weigh about 11 pounds and are among the largest of the small mammals. This blog entry will focus on the smaller small mammals: Mice, small squirrels like chipmunks and shrews.

I am not currently engaged in any small mammal research (beyond simple inventorying of species) but I teach proper capture and handling techniques in my classes. Let's review the equipment first.
Sherman trap at a forest location
Naples, NY (7/14)
The photo at left shows a type of trap called a Sherman trap. Here is the link to the short entry on these traps in Wikipedia. Note that you can go to the company website from there if you want information on sizes, prices, etc. These traps have become the standard for live trapping as they are light, durable and fairly easy to clean. Importantly, they keep the trapped animal secure inside solid walls rather than a wire mesh cage. This provides the captured critter with more protection from weather and they may feel more secure as the closed trap is similar to a hole or burrow that most small mammals would seek for shelter. The flag serves several purposes. First, it makes the trap easier to locate. And by numbering the flags data collection is simplified. This is deployment #13 on the blue transect. Finally, if animals are not processed at the spot they are collected, a flag allows field workers to return the animal to the exact location it was captured.

Traps such as these require bait to increase the capture rate. I mean, a small mammal could stumble in and investigate, but bait is needed to really make this work. Much has been written regarding various bait effectiveness. We use the following recipe ( I believe credit goes to SUNY ESF???):
Sasha makes this for us but I believe this is a SUNY ESF recipe
A few things about this recipe. It is pretty simple and we have had good success with it. Other popular ingredients include raisins, molasses and nuts. It is difficult to break it into perfect squares, so we usually are faced with a plastic bag full of oddly shaped pieces. I tell the students to use bait about the size of a Starburst candy. There is really no need to use more. Traps are checked frequently and there is no chance the animal would need more food.
We also place cotton balls in the traps along with the bait. Cotton serves several purposes. It acts as insulation against the cold of the bare metal and it also gives the captured animal something to do. In my experience, captured rodents often shred the cotton balls and create a "nest".
Other useful equipment for setting traps includes plastic gloves for handling bait, GPS receiver for marking trap locations and a notebook. Please note that there is a different equipment list for checking traps.

To increase capture rate, we typically pre-bait traps for about a week. This entails setting the traps in their transects, adding cotton balls (I like to use two) and bait and leaving the back door open so any animal that enters the trap is free to leave. This can increase capture rate by getting the animals used to visiting the trap for a reward (bait). We try to re-bait every second or third day. It also gives us a chance to see the activity level in the area. If many traps are being cleaned out, we expect a bigger capture when the traps are finally set. One disadvantage of pre-baiting is that larger animals can also find your traps. We have had problems with raccoons, striped skunks and gray squirrels finding and raiding traps. Here are some examples:

Striped skunk raiding a Sherman trap
Canandaigua, NY (11/13)
Last November, we had several transects set on the main campus at FLCC. One was being raided. We set a camera trap and captured this striped skunk opening the trap and eating the bait. Sherman traps open like this to facilitate cleaning (there is a model that folds that does not open). In this case, pre-baiting allowed this skunk to find our traps and raid them numerous times during the week. To counter this, we used a small rope and two tent stakes to hold down each trap and the skunk was unable to get the bait.
Each May we offer a Conservation Field Camp course and small mammal trapping is part of that. Here, two technicians set and bait a Sherman trap specifically targeting flying squirrels.

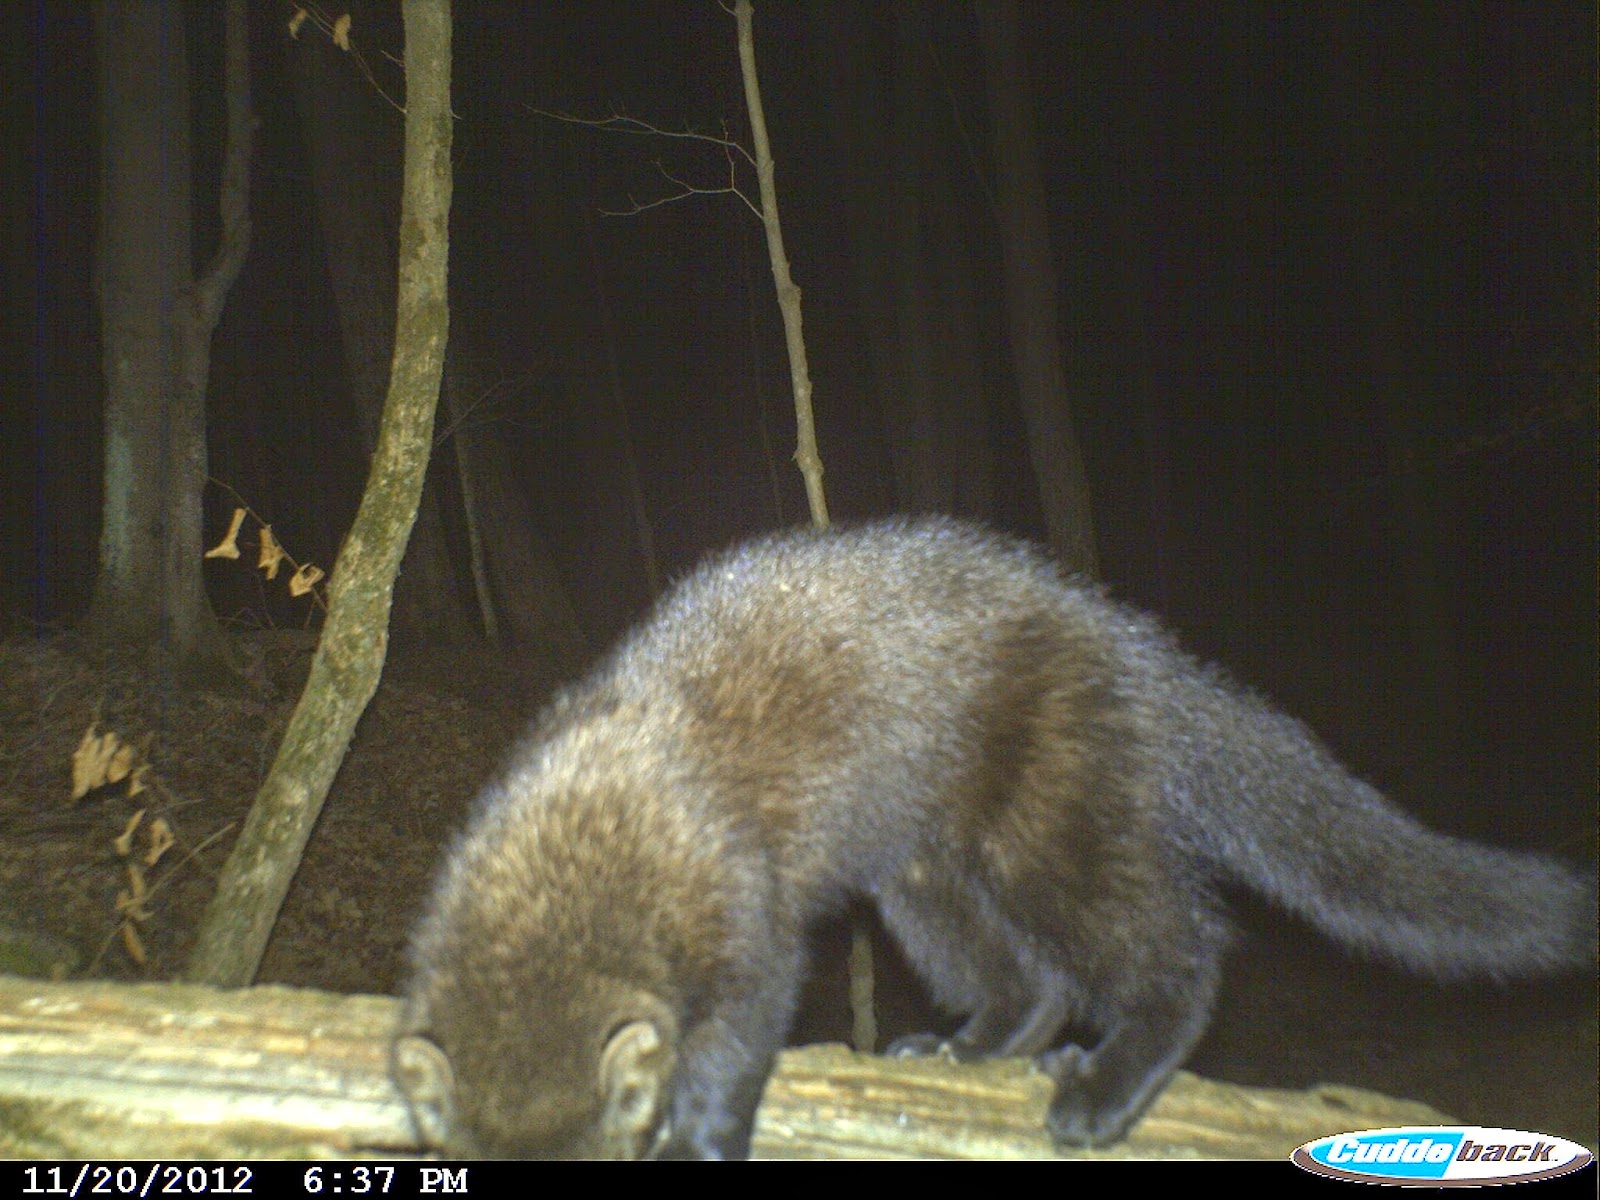
This time it was a gray squirrel causing us problems:


A final example is more recent. We had traps set at our East Hill Campus in Naples for the past several weeks and one or more raccoons were hitting two of the four transects. Here, Sasha walks away from a trap after setting it. You can see that the back door is closed. The spring-loaded front door is facing away from the camera.

It only took about five and a half hours for this coon to visit. He found this set during the pre-baiting period. In this photo he is starting to reach into the trap.

It is difficult for him to reach the bait without triggering the trap. By now, I bet this guy has enough experience with these traps to know that if he pulls out his arm without the bait, he won't get a second chance as the door will close.

As mad as I get at them, this picture makes me smile. 

The rock wall transect was getting hit as well. Here is a pre-bait photo. Notice first that you are looking at an open back door. The back door is not spring loaded so animals are free to move in and out. To try to increase the camera trap captures at this photo, Sasha placed some natural bait (hickory nuts and mushrooms) on a rock.

Less than two hours later, an eastern chipmunk enters the trap and presumably takes some of the bait.

As hoped, there were lots photos at this location, including some mice in the genus Peromyscus. Check out this mouse in mid-leap with an open Sherman trap in the background. I thought "What a lucky shot! That'll never happen again." Well.....

... I was almost right. Several nights later, I got a photo of presumably the same mouse JUST ABOUT to make the same leap. So I did not get him mid-leap, but I did capture the same behavior a second time.

And then a third... Here I present them to you in the order they were taken. All were captured on different nights. But when I use these in class, I will be putting them in "order" to make it look like a sequence of three photos of one mouse making one jump :)
But back to marauding raccoons. Here is the last image of the trap with the back door open. Notice the edge of the opening. 

Since the last photo, Sasha has closed the back door, set the spring loaded front door, re-baited the trap and turned it around so that the opening is still in the same direction as it was during the pre-bait week. Can you see how the edge of the opening looks different than in the photo above? The front door opening has a bit of a lip that the door closes against.

Here is the very next photo captured. The door is closed and the mushrooms have been moved. Obviously, the camera missed some things.

Not far behind was this raccoon. When we checked the traps, this one was tossed open and empty. Was there a critter in the trap when the coon opened it? Probably, but we will never know for sure.

Once we capture a small mammal, the handling protocols we use are designed to assure a safe and quick experience. For example, shrews are particularly susceptible to trap-stress, so our protocol calls for processing them first. Students are instructed to keep noise to a minimum. We still talk, but we use our inside voices. Students work in pairs with one wielding the clipboard while the other processes the animal. And as mentioned previously, animals are returned to the exact location of their capture.
Let's start at the beginning. Students check all the traps in a given transect. If there is a small mammal captured in a trap, the trap label is marked with the flag number and color and taken to the processing location. Since the goal of the activity is to teach the students how to participate in all aspects of small mammal trapping and handling, we process the animals in a central location so we can all learn from all captures. You may wish to process animals right at the capture site depending on your research question.

Removing an animal from the trap is not difficult, but does take some practice.
Here, FLCC professor Clinton Krager places a large Ziploc bag over the back door of a Sherman trap. The bag opening is folded over so the animal cannot escape. We use plastic bags for two reasons. It is easier to see the animal in the plastic bag rather than a cloth bag and therefore makes the process go faster. The animals do not spend much time in the plastic bag so they do not run out of air or get too hot.


Sometimes an animal is reluctant to leave a trap even after shaking it a little. A nice trick is to aim the opening up. Often an animal will scoot right out.
Author removing a flying squirrel from a live trap
Photo credit: Alyssa Johnson
When the animal is in the bag, the bag and contents are weighed. Usually, the cotton and some bait are in the bag as well as the animal. Once the animal is removed from the bag, the bag and contents are weighed and subtracted from the total to find the true weight of the animal.


Weighing a mouse with a spring scale
Canandaigua, NY (4/14)


The next step is removing the animal from the bag. Here, Clinton holds the bag against his leg and uses one
hand outside of the bag to hold the animal while sliding his other hand onto the bag to grab the animal by the scruff of the neck. Again, the animal spends a short amount of time in the bag and the researcher can see the animal easily. I have also found that animals will latch on to cloth bags with teeth and claws making them harder to extract. This technique works very well with small small mammals. It does not work well with larger small mammals like gray squirrels. Oh, and flying squirrels have lots of loose skin and can be difficult to hold so that they cannot reach around and bite.

Sasha is holding an eastern chipmunk properly. This was her first chipmunk. They can be bitey, so she was using gloves. The data we collect is pretty basic. I mentioned weight. We record the species, gender, total and tail lengths and age (adult, immature or unknown).


If we are holding an animal for any length of time (to let students observe it), we place it in a jar. The jar
makes it easier to see and most animals calm right down when placed inside. Meadow voles will begin grooming almost immediately when put in a jar.
Finally, we have experimented with different methods of marking small mammals. Ear tags are available in various sizes and easily attached to most critters (not shrews). Since I am not engaged in a research project that requires permanent marking, I do not ear tag. However, we do use non-toxic markers to make an X on the belly. It does not last very long, but it works for a quick mark-recapture study.


Male with enlarged testes and large distance from the
anus to the genital
Naples, NY (7/14)