Showing posts with label Mist net. Show all posts

Friday, June 17, 2011

Mist netting for bats!!! PART II

Tanner DeWolf erects bat mist net
(6/11, Canandaigua NY)
Our second night of mist netting for bats was as exciting as our first (see previous post). Again, the nets were placed in the woodlot along the main pathway. This provided a clear area for the nets themselves with a canopy overhead. Apparently, this is an ideal situation to capture many bat species. I know from mist netting birds that a net placed in the open is often spotted and avoided. I could only imagine that the canopy cover provided a barricade of sorts funneling the bats into the nets rather than around them. As I mentioned in my last post, we used three nets stacked on top of each other. This requires some very tall and light poles. Micheal and Tanner had a rig that consisted of four aluminum poles that fit together via tapered ends. At the top of the end pole was a pulley so the net could be raised and lowered like a flagpole. At the bottom of the first pole was a cleat to wrap the pull rope around. Each net also had two guide lines from the top that got tied off at angles to help secure the pole.

Even more interesting than the pole was the rig used to attach the nets. As you may have seen in my posts regarding mist netting birds, the elastic loops of the net are simply wrapped around the pole and if I need to lower the net, I simply tug on it until it slides down. However I am not stacking three nets on top of each other (the top of the highest net rises to about 25 feet off the ground). For the bat nets, a simple but ingenious series of PVC pipe slices and carabiners  is used to attach the nets. These PVC cookies are attached to a rope that can raise and lower the series. It worked very well and kept the nets properly spaced to boot.
Tanner assists John Van Niel in attaching mist nets
(Photo by: Elaina Burns)
As with the first night, we set the nets at sunset and noted the time. We were to check the nets every ten minutes. On the very first net check, we watched a bat actually fly right into the net. And to our surprise and delight found it was a red bat! First off, this was a new species for us. Secondly, it was really striking. That reddish color was amazing. Finally, Micheal had told us that we were far more likely to catch "cave bats" rather than "tree bats" as the tree bats tended to fly higher, above the tree canopy. And the red bat is one of the three species of tree bats in NY State. Tree bats roost singly, often under the bark of trees while cave bats roost colonially, often in caves. But common names can be deceiving. If I found a group of little brown bats roosting in a hollow tree, they would still be cave bats :)

Removing red bat from mist net
(6/11, Canandaigua NY)
Here is a photo of Clinton Krager taking the bat out of the net. Notice the sharp fold at the tip of the wing on this species. At first, I assumed the wing was damaged! But that is normal for this species. That fold is literally the last joint of a finger bone. Bats are in the Order Chiroptera which translates to "hand wing" and that is a good description of their anatomy. The bones you see that form the support for the wing membrane are finger bones. Note that the thumb has remained small and usually has a sharp nail to aid in climbing. By the way, most of the bats we removed from the nets squawked and showed their teeth. This bat was not in pain but clearly he was not happy.

Dorsal side of a red bat showing the furred tail
and wing membrane
(6/11, Canandaigua NY)
We brought the bat to Micheal to confirm the identification and he showed us a few other key characteristics of tree bats. He had mentioned that they were hairier than the cave bats during our Friday lecture, but I wasn't sure what he meant. Here he shows us the fully furred rear of the tail as well as the partially furred back of the wing. I wonder if these are adaptations to retain heat for a species that roosts alone rather than in a group.


Measuring the forearm of a red bat
(6/11, Canandaigua NY)
There are some standard measurements taken on all bat species. In the last entry, I talked about measuring the tragus (inside the ear). Here is a photo of Micheal measuring the forearm of the red bat. He told us that it is standard to take all measurements on the right side of the animal and that forearm measurements are unique to bats. There would be little use in taking that metric in other types of mammals.

Inspecting the nipple of a red bat
(6/11, Canandaigua NY)


While taking measurements, Micheal determined that this bat was pregnant. He pointed out the somewhat obvious bulge and remarked that the weight of the pup (or two in some species) is a considerable load for the mother and impacts her ability to fly and specifically on her ability to take off. Micheal gently blew on the hairs of the bat (much as I do on the feathers of a bird when I look for a brood patch) in order to expose the nipples. Since her nipples were hairless, that indicated that she had been a successful breeder in the past. Apparently, once a pup nurses, the hairs on the nipple are worn off and are never replaced. It is not possible to tell how long ago she had young or how many of them she produced. But it is a good measurement that shows she HAS been successful in the past. I am willing to bet that most people have never thought of bat milk before! :)

Wednesday, June 15, 2011

Mist netting for bats!!! PART I

Big brown bat in mist net
(6/11, Canandaigua, NY)
I just got my first taste of mist netting for bats and I am hooked! I have been catching birds for almost 15 years but have no experience with bats. Thanks to a grant from the NSF, several of us have been able to participate in training to increase our field research skills. Clinton Krager from the Science Department wanted to start a project on bats and I asked to tag along for the training he would need to receive.

Step one in the process was to find someone willing to conduct the training. I suggested Micheal Fishman, whom I first met through our mutual volunteerism at the Montezuma National Wildlife Refuge about a decade ago. Micheal readily agreed and a date was settled for early June.

Step two was to get our rabies pre-exposure vaccinations. This was a series of three shots, over about a month and is the same as what one would receive AFTER a bite.

Clinton Krager (center) and Micheal Fishman (right)
(6/11, Canandaigua NY)
The evening started with all participants (faculty, staff, students and alums of FLCC) enjoying a very informative presentation by Micheal while we scarfed down pizza and soda and peppered him with questions. We learned what to look for in identifying the nine species of bats in NY while in the hand as well as a fair amount of anatomy and physiology. The lecture concluded with a discussion of rabies and of course, white nose syndrome (WNS). For those of you not familiar with WNS, let me refer you to the NYS DEC website for more information.

Micheal uses a triple stacked net rig. On this day, we erected three sets, each six meters wide and 2.6 meters high. Each handler was required to wear leather gloves with rubber gloves over them. The rubber gloves were thrown out before a new bat was handled to reduce the chances of transferring anything (such as fungus or rabies virus) from one bat to another.

Our catch for the night:
Seven big brown bats
One little brown bat
Since we did not mark the bats, we cannot confirm (but suspected one) any recaptures. We got to see males and females (one pregnant) and Micheal taught us how to evaluate the nipple to determine if the females had been successful breeders in the past.

Tanner DeWolf removes bat from mist net
(6/11, Canandaigua NY)
I found the process of removing the bats from the mist net similar but not identical to removing birds. For example, birds do not bite through nets as the bats seemed to do. In addition, the wings on a bat are just shaped so differently from bird wings that I had some difficulty working the net over them at first. When I first started netting birds, I always carried a small Swiss army knife so I had scissors and a toothpick handy. The scissors are a last resort, but the toothpick worked great to tease the net off a toe or over the alula feathers. Micheal and his assistant Tanner used mechanical pencils to help them get the net strands off the bats and it worked like a charm.
John Van Niel removing bat from mist net
(Photo by Elaina Burns)
We only caught one little brown bat, but I got to take it out of the net. To tell you the truth, I wasn't sure of the identity of the species until Micheal confirmed it for us at the processing station. As I get to handle more bats, I am sure that I will get better at identifying them in the hand.


Measuring the tragus on a
little brown bat


Bat bands
(6/11, Canandaigua NY)
We did not band the bats but Micheal showed us the bands. On a bird, you band just above the toes. On a bat, you place the band on the wing. Further, a bird band is closed completely around the bird's "leg" (actually the foot... for some discussion and photos about bird banding see this post ) while a bat band is pinched onto an arm bone (sort of like an ear cuff is placed on a person's ear).


The final two photos of this entry show photos of back lit wings of two different big brown bats (they were pretty imaginative when they names these species weren't they??). The back lighting shows any necrotic tissue present that may be from WNS. This first photo does not show much damage. You are looking for small white spots...
In this next photo, the damage is more extensive.
Photographing wing to show necrotic tissue
(6/11, Canandaigua NY)
And this was all on Friday! I still have Saturday to write about....
Clinton Krager
(6/11, Canandaigua NY)

Friday, June 3, 2011

Conservation Field Camp 2011: Mist netting Part II

Let me provide a little more details about mist netting. All of the photos that include me were taken by Erin Lord, one of the wildlife technicians hired for the class (Thanks Erin!).

Bander removes bird from net
(5/11, Photo by Erin Lord)
I use nets that are 10 meters long and have a fairly fine mesh to catch smaller birds. The net is constructed of nylon and can be nearly invisible to the naked eye when there is vegetation in the background. This is important as birds have tremendous visual acuity. There are support lines that run along the net called trammel lines. The netting that runs from one parallel trammel line to the next is wider than it needs to be so that some slack is created. This is the "bag" that the bird is captured in.  That's me on the left with my back to the camera. Banders always wear old clothes since birds often defecate in the hand. Mist netters have to additionally eschew buttons, zippers and anything else that can easily tangle in the nets. As I mention in a previous post the purpose of the mist netting is merely for demonstration and I rarely catch more than a few birds in the hour or so I conduct the lesson. This year was notable for some very colorful captures.
Chestnut-sided warbler in mist net
(5/11, South Bristol NY)
On Monday, I captured this male chestnut-sided warbler. The weather had cleared just enough to set out the nets and within minutes I had my first catch of the day. I just love the lemon cap! The birds often look to be caught worse than they really are. I often have a gaggle of students watching me extract a bird, so there is a little extra pressure to do it quickly. But I always remember that the health of the bird comes first.


Removing bird from mist net
(5/11, Photo by Erin Lord)


Some general principals for removing birds from a net: Keep the legs parallel to prevent injury. Never move a wing in a way that the bird wouldn't. Be careful when tugging so as not to strain the bird. Students always want to help, but having them hold the net actually makes it harder for me to remove the bird since I have a hard time telling when I am pulling on the bird too much.

Occasionally, a bird is so tangled that I have to cut the net. In those cases, I make as few cuts as possible. Partly to save the net, but mostly to avoid removing a bird while retaining strands of netting around it. Imagine cutting a bird from a net but leaving a "vest" of netting on it to abraid its skin for the rest of its life.


Chestnut-sided warbler in the hand
(5/11, Photo by Erin Lord)
Once I have the bird out of the net, I can better inspect it for overall condition. Here I am holding him in the "photographer's grip". I have his legs parallel between my first two fingers with my knuckles towards the bird and I use my thumb to hold the legs in place. A firm grip prevents the bird from slipping and sliding and perhaps straining his legs.

In this grip, I watch for signs of stress. These include a drooping head, closed eyes (or eye), panting or other listless behavior. A rookie mistake is to assume that a quiet bird is good while a squawking bird is bad. In fact, the opposite is often the case. But his guy looks bright and alert....


Banding a female American redstart
(5/11 Photo by Erin Lord)
For some reason, I cannot find the photo of me banding the chestnut-sided warbler, so we will settle for this photo of the other warbler I caught that day: a female American redstart. I can tell this is a female because she is brownish with yellow patches. A male is black with orange patches (hence the nickname "pocket oriole" for this small bird). I am holding her in what is called the bander's grip. The first two fingers now go gently around the neck and are held just tight enough so the head cannot slip through. A bird's head is much wider than the neck so this is a safe way to hold one while allowing it to breathe. Fun fact: If you enlarge the photo, you can see that I am placing the band below the bird's ankle. Most people think of that part of the leg as the shin, but a bird actually walks on its toes. Think about it. Knees bend in the opposite direction as the ankle, so it is actually a "foot band" although we all call it a "leg band" :)

Bander and conservation students
(5/11, Photo by Erin Lord)
Once I have the bird properly banded, I take it around for the students to see up close and personal. In this photo, I am showing the bird to Jen, one of my favorite students (even though she is a Yankees fan). I love to watch how excited people get around live wild birds and I never forget how privledged I am to be able to introduce them to something so special.

Sunday, May 29, 2011

Conservation Field Camp 2011: Mist netting

One of the required courses for our Conservation students at Finger Lakes Community College is Conservation Field Camp (CON 190). Field Camp is held at Cutler Boy Scout Camp in South Bristol, NY. This year, we had about 110 students that rotated through four different days of activities: Aquatics, Forest Ecology, Wildlife and Forest Products. As part of the "Wildlife" faculty,  I spent the week catching small mammals in Sherman traps, mist netting for birds and calculating our capture effort using camera traps. This coming week, I will present the highlights.

Mist netting at Camp is more of a demonstration than anything else. I set out two 10 meter nets for about an hour. I average about two to three birds per day, just enough to show the students how this is done. We band the birds, micro age them and check for brood patches and cloacal protuberances. This year, I tried a new location at Camp, amidst some good brush. I caught American Redstart, Baltimore Oriole, Ruby-throated Hummingbird, Great Crested Flycatcher, Song Sparrow and Chestnut-sided Warbler.

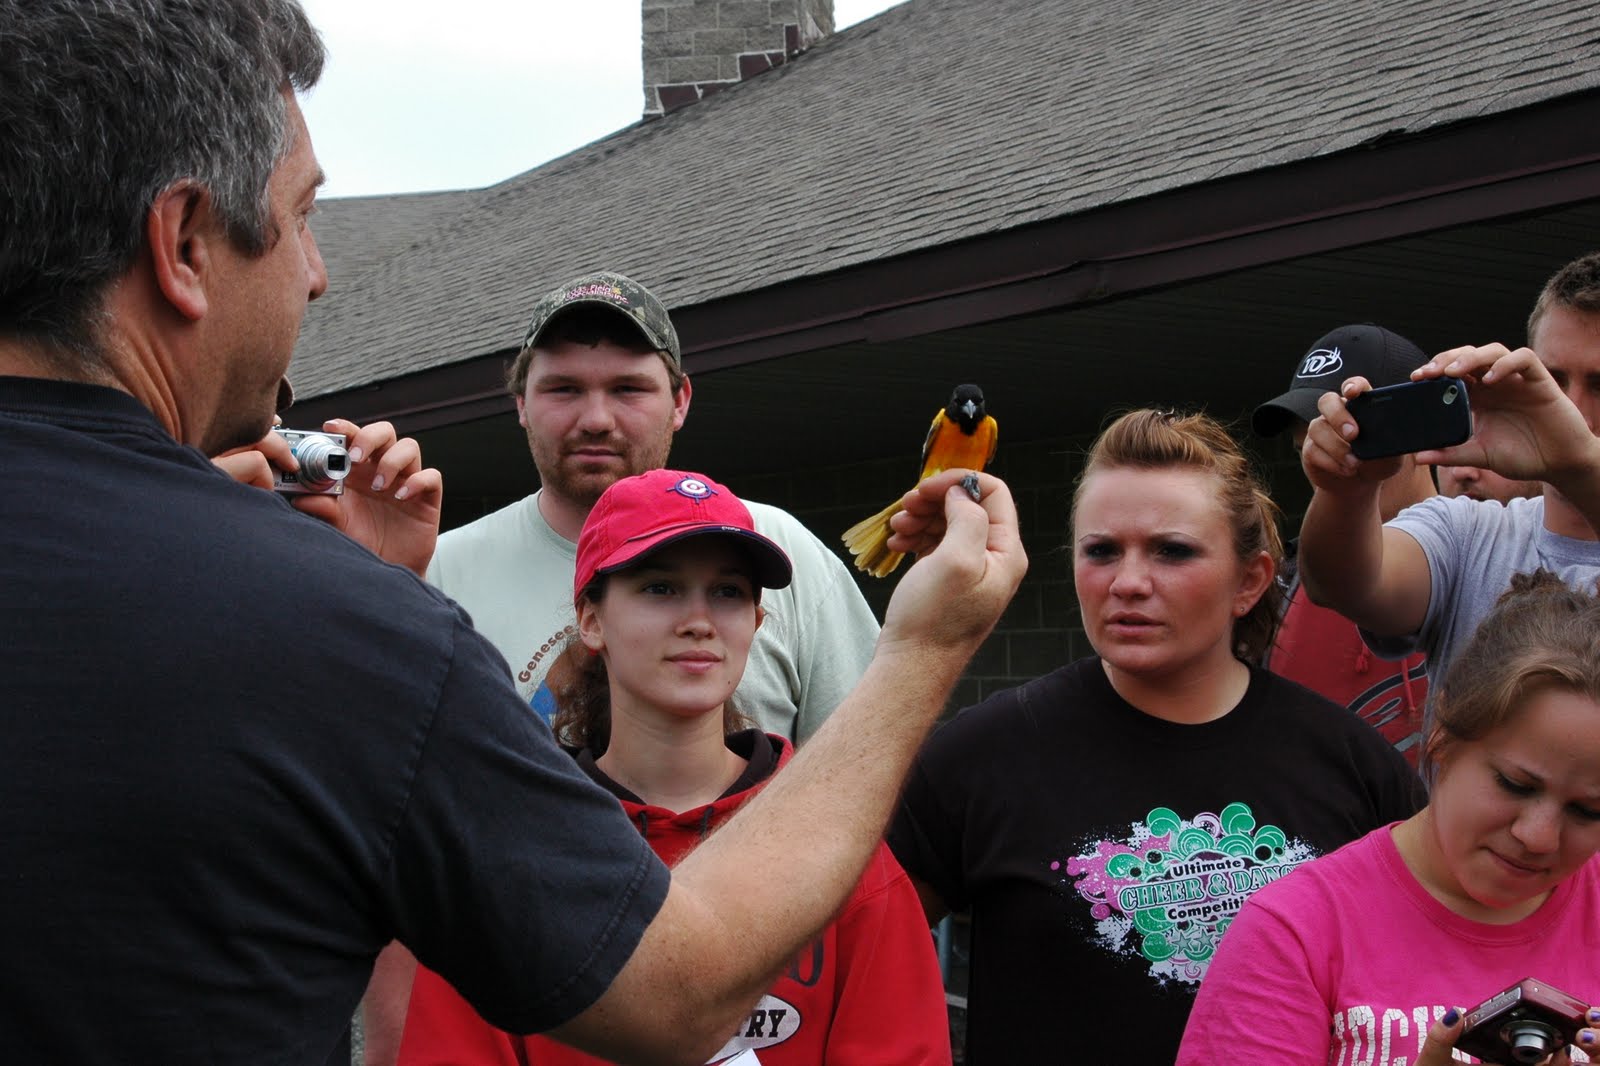
Baltimore Oriole, South Bristol, NY
(5/11, Photo by Erin Lord)
Baltimore Oriole: Here is a nice male oriole. He had a fully protruding cloaca, telling me that he was in breeding condition. I am holding the bird in what is called the photographer's grip here to show off his plumage to the students. I aged him as an SY (Second Year) male due to the incomplete molt of his tail feathers. Birds are powerful. They are dynamic and, like this one, can be beautiful works of art. When banding for an audience, I never forget that I may be the one talking, but the bird is the real star.


Baltimore Oriole, South Bristol, NY
(5/11, Photo by Erin Lord)

Next post, I will explain more about the mist netting process. For now, enjoy the photos from one of the wildlife techs for Field Camp, Erin Lord.